Heatmaps are a fundamental visualization method that is broadly used to explore patterns within multidimensional data. Let’s say you have some numerical data in a data frame or a presence/absence matrix.
As you can see, the base function already has some customizability. However, there are some important features missing:
Annotations: Only basic color bars for rows and columns possible, no legends!
Layouts: No support for multiple heatmaps in one plot, or splitting of cells.
Integration: No integration with other plots.
Usability: Somewhat unintutive syntax.
High-level Heatmaps
As heatmaps are commonly used in analysis of big multidimensional datasets like genome-wide gene expression data1, or methylation profiling2, the basic functionality of the stats::heatmap() is often not enough. As a result, several specialized packages have been developed, some of which I want to showcase here:
The pheatmap package gets the job done, even though the annotation and coloring takes getting used to. The biggest problem is, that THERE IS NO VIGNETTE OR TUTORIAL OR DOCUMENTATION, other than the basic help page.
# tidyheatmaps can use the df directly:tidyheatmaps::tidyheatmap(df = gene_expression_data,rows = external_gene_name,columns = sample,values = expression)
# tidyheatmaps can use the df directly:tidyheatmaps::tidyheatmap(df = gene_expression_data,rows = external_gene_name,columns = sample,values = expression,# annotation is REALLY easyannotation_col =c(sample_type, condition, group),annotation_row =c(is_immune_gene, direction),# other features are as simple as turning them on:cluster_rows =TRUE,cluster_cols =TRUE,display_numbers =TRUE,# all of the pheatmap features are availablefontsize_row =10,scale ="none",colors =colorRampPalette(c("navy", "white", "firebrick3"))(50),color_legend_n =50,fontsize_col =7,angle_col =45,show_colnames = T, show_rownames = F,main ="tidyheatmaps with annotations")
The tidyheatmaps package is basically just an interface to pheatmap, but it makes the creation much simpler. Also, there is a bit more documentation available (albeit not that much more)
The tidyHeatmap package is developed by the same author that created the tidygate, tidySingleCellExperiment, tidyseurat, tidybulk, and tidySummarizedExperiment packages. It uses the ComplexHeatmap package as graphical engine. Main features: * Modular annotation with just specifying column names * Custom grouping of rows is easy to specify providing a grouped tbl. For example df |> group_by(…) * Labels size adjusted by row and column total number * Default use of Brewer and Viridis palettes
# tidyHeatmap can use the df directly:tidyHeatmap::heatmap(gene_expression_data,.row = external_gene_name,.column = sample,.value = expression)
tidyHeatmap says: (once per session) from release 1.7.0 the scaling is set to "none" by default. Please use scale = "row", "column" or "both" to apply scaling
tidyHeatmap::heatmap(gene_expression_data %>%# grouping is done directly via the dataframe:group_by(condition),.row = external_gene_name,.column = sample,.value = expression) %>%# annotations are done a bit differently: tidyHeatmap::add_tile(c(sample_type,condition,group, is_immune_gene,direction))
tidyHeatmap::heatmap(gene_expression_data %>%# grouping is done directly via the dataframe:group_by(condition),.row = external_gene_name,.column = sample,.value = expression) %>%# annotations are done a bit differently: tidyHeatmap::add_tile(c(sample_type,condition,group, is_immune_gene,direction))
Warning: `add_tile()` was deprecated in tidyHeatmap 1.9.0.
ℹ Please use `annotation_tile()` instead
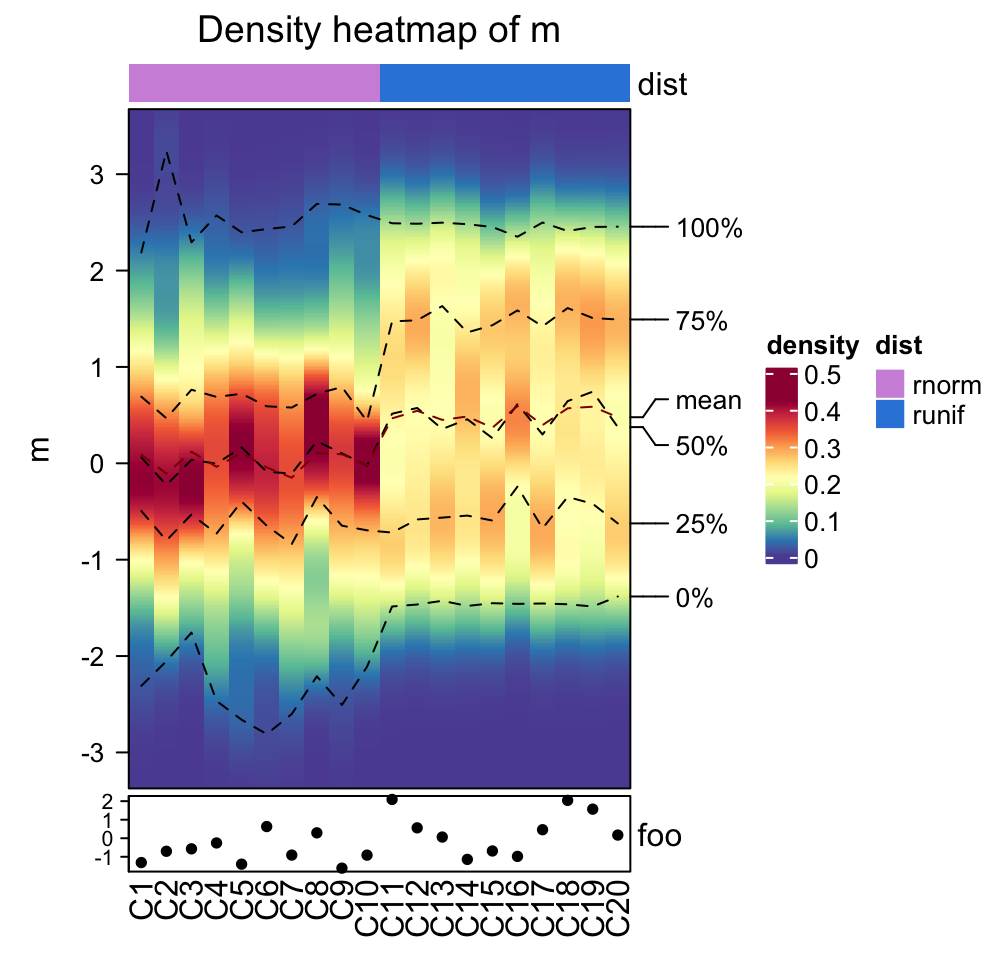
# tidyHeatmaps lets you do some crazy stuff with annotations:tidyHeatmap::heatmap(gene_expression_data %>%# lets add some more random data for annotation types tidyr::nest(data =-sample) |> dplyr::mutate(val1 =rnorm(n(), 4,0.5)) |> dplyr::mutate(val2 =runif(n(), 50, 200)) |> dplyr::mutate(val3 =runif(n(), 50, 200)) |> tidyr::unnest(data),.row = external_gene_name,.column = sample,.value = expression) %>%# annotations are done a bit differently: tidyHeatmap::add_tile(c(sample_type,condition,group, is_immune_gene,direction)) %>%add_bar(val1) |>add_point(val2) |>add_line(val3)
Warning: `add_bar()` was deprecated in tidyHeatmap 1.9.0.
ℹ Please use `annotation_bar()` instead
Warning: `add_point()` was deprecated in tidyHeatmap 1.9.0.
ℹ Please use `annotation_point()` instead
Warning: `add_line()` was deprecated in tidyHeatmap 1.9.0.
ℹ Please use `annotation_line()` instead
The tidyHeatmap package is designed with biological data in mind, and provides a nice interface to the ComplexHeatmap package. It has some decent documentation, however the documentations is outdated at times.
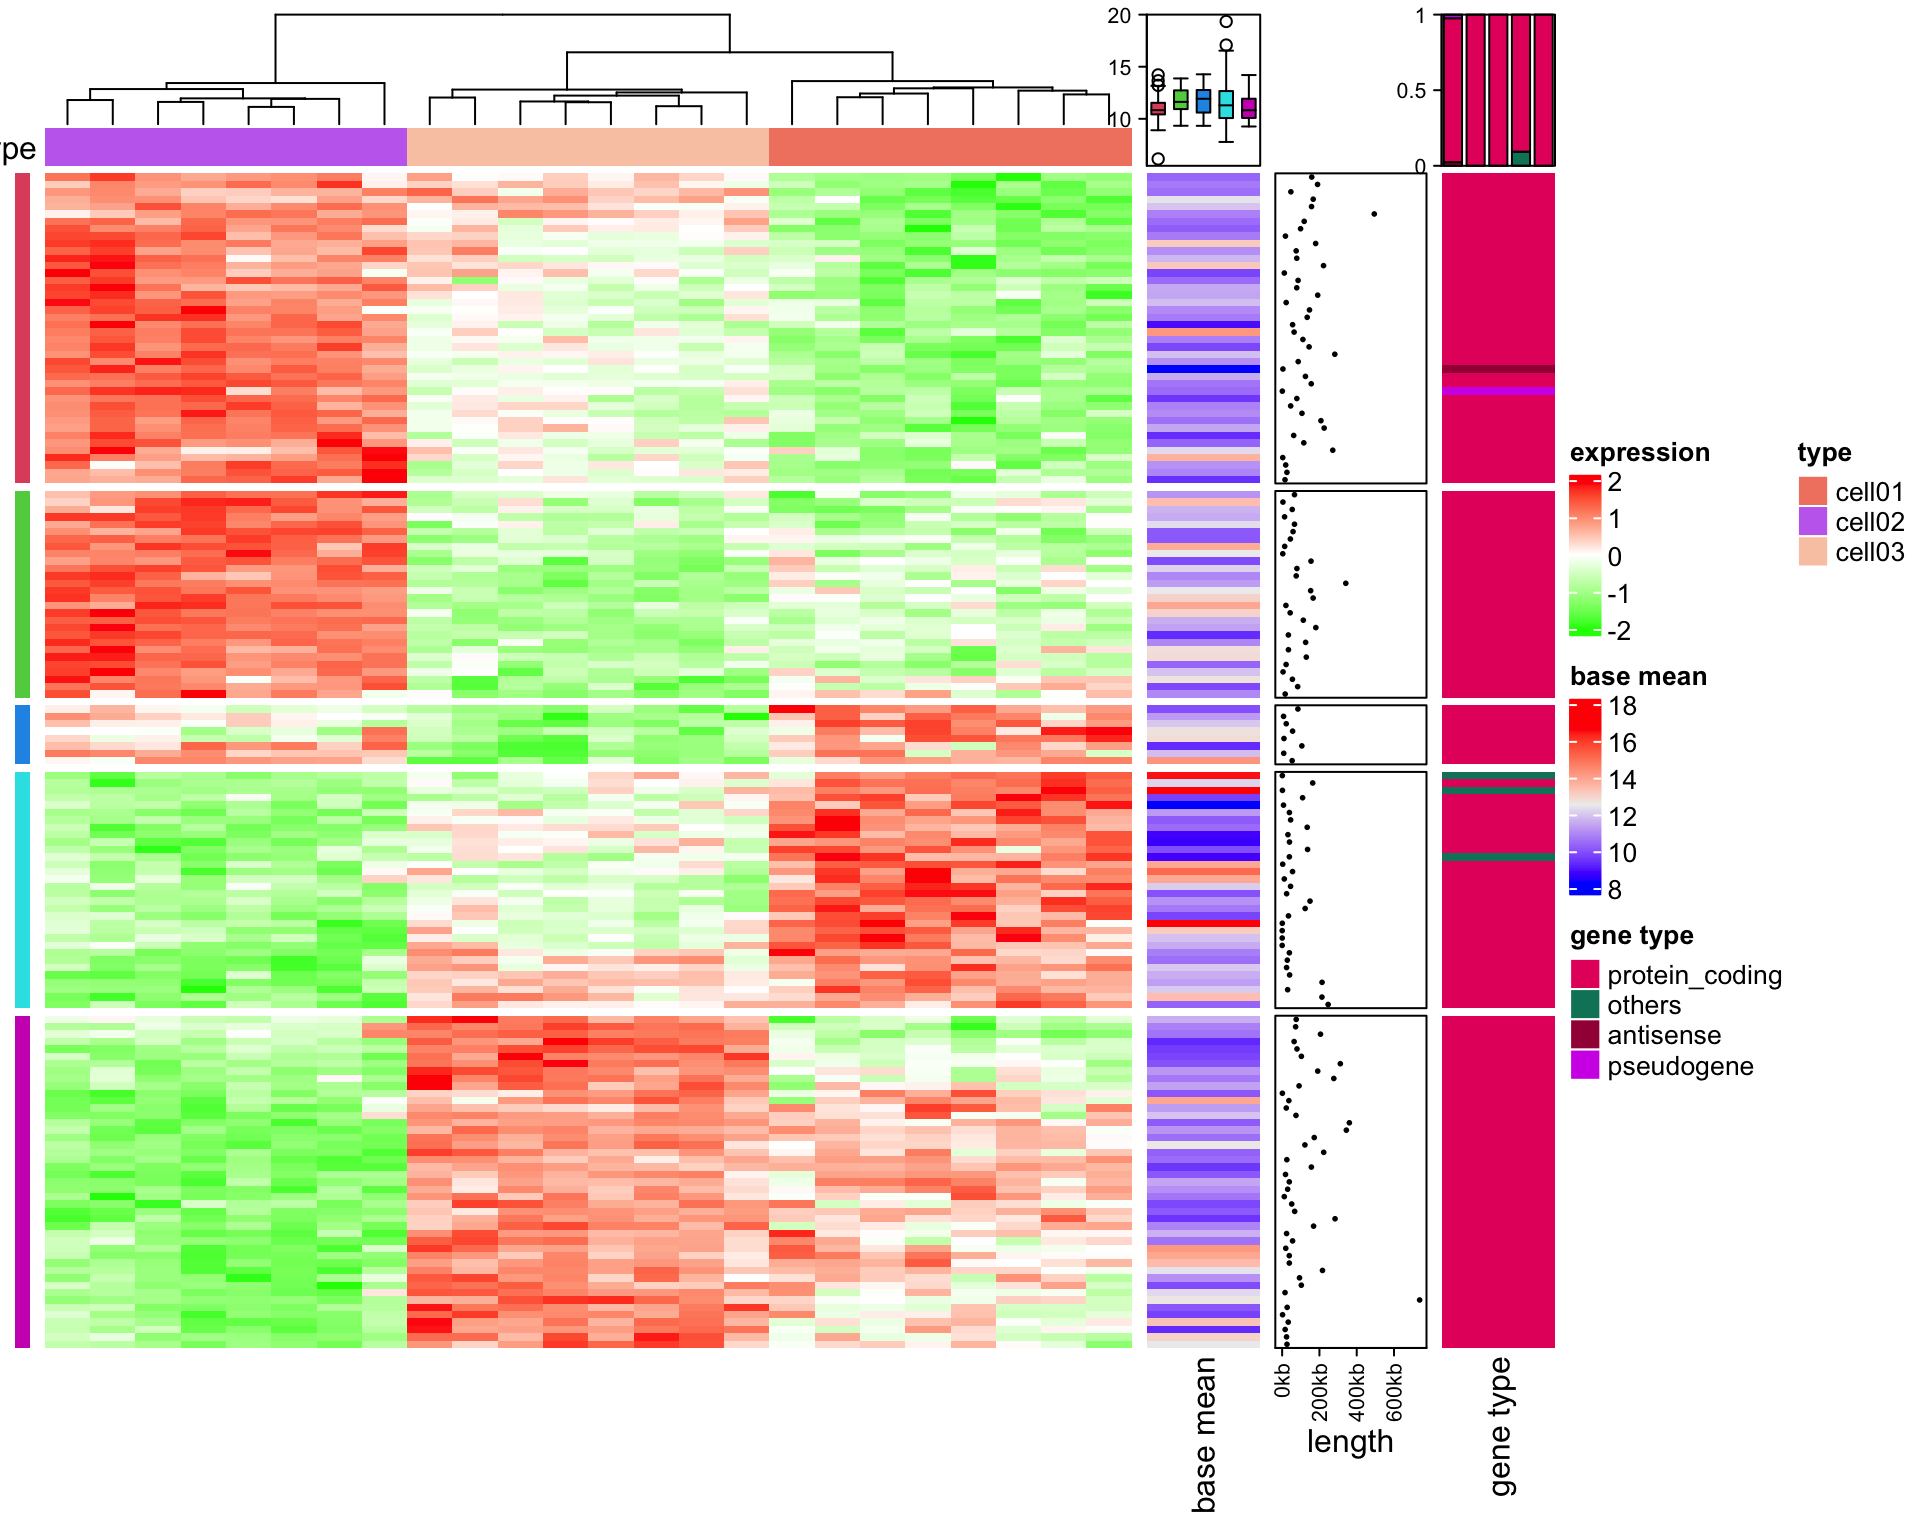
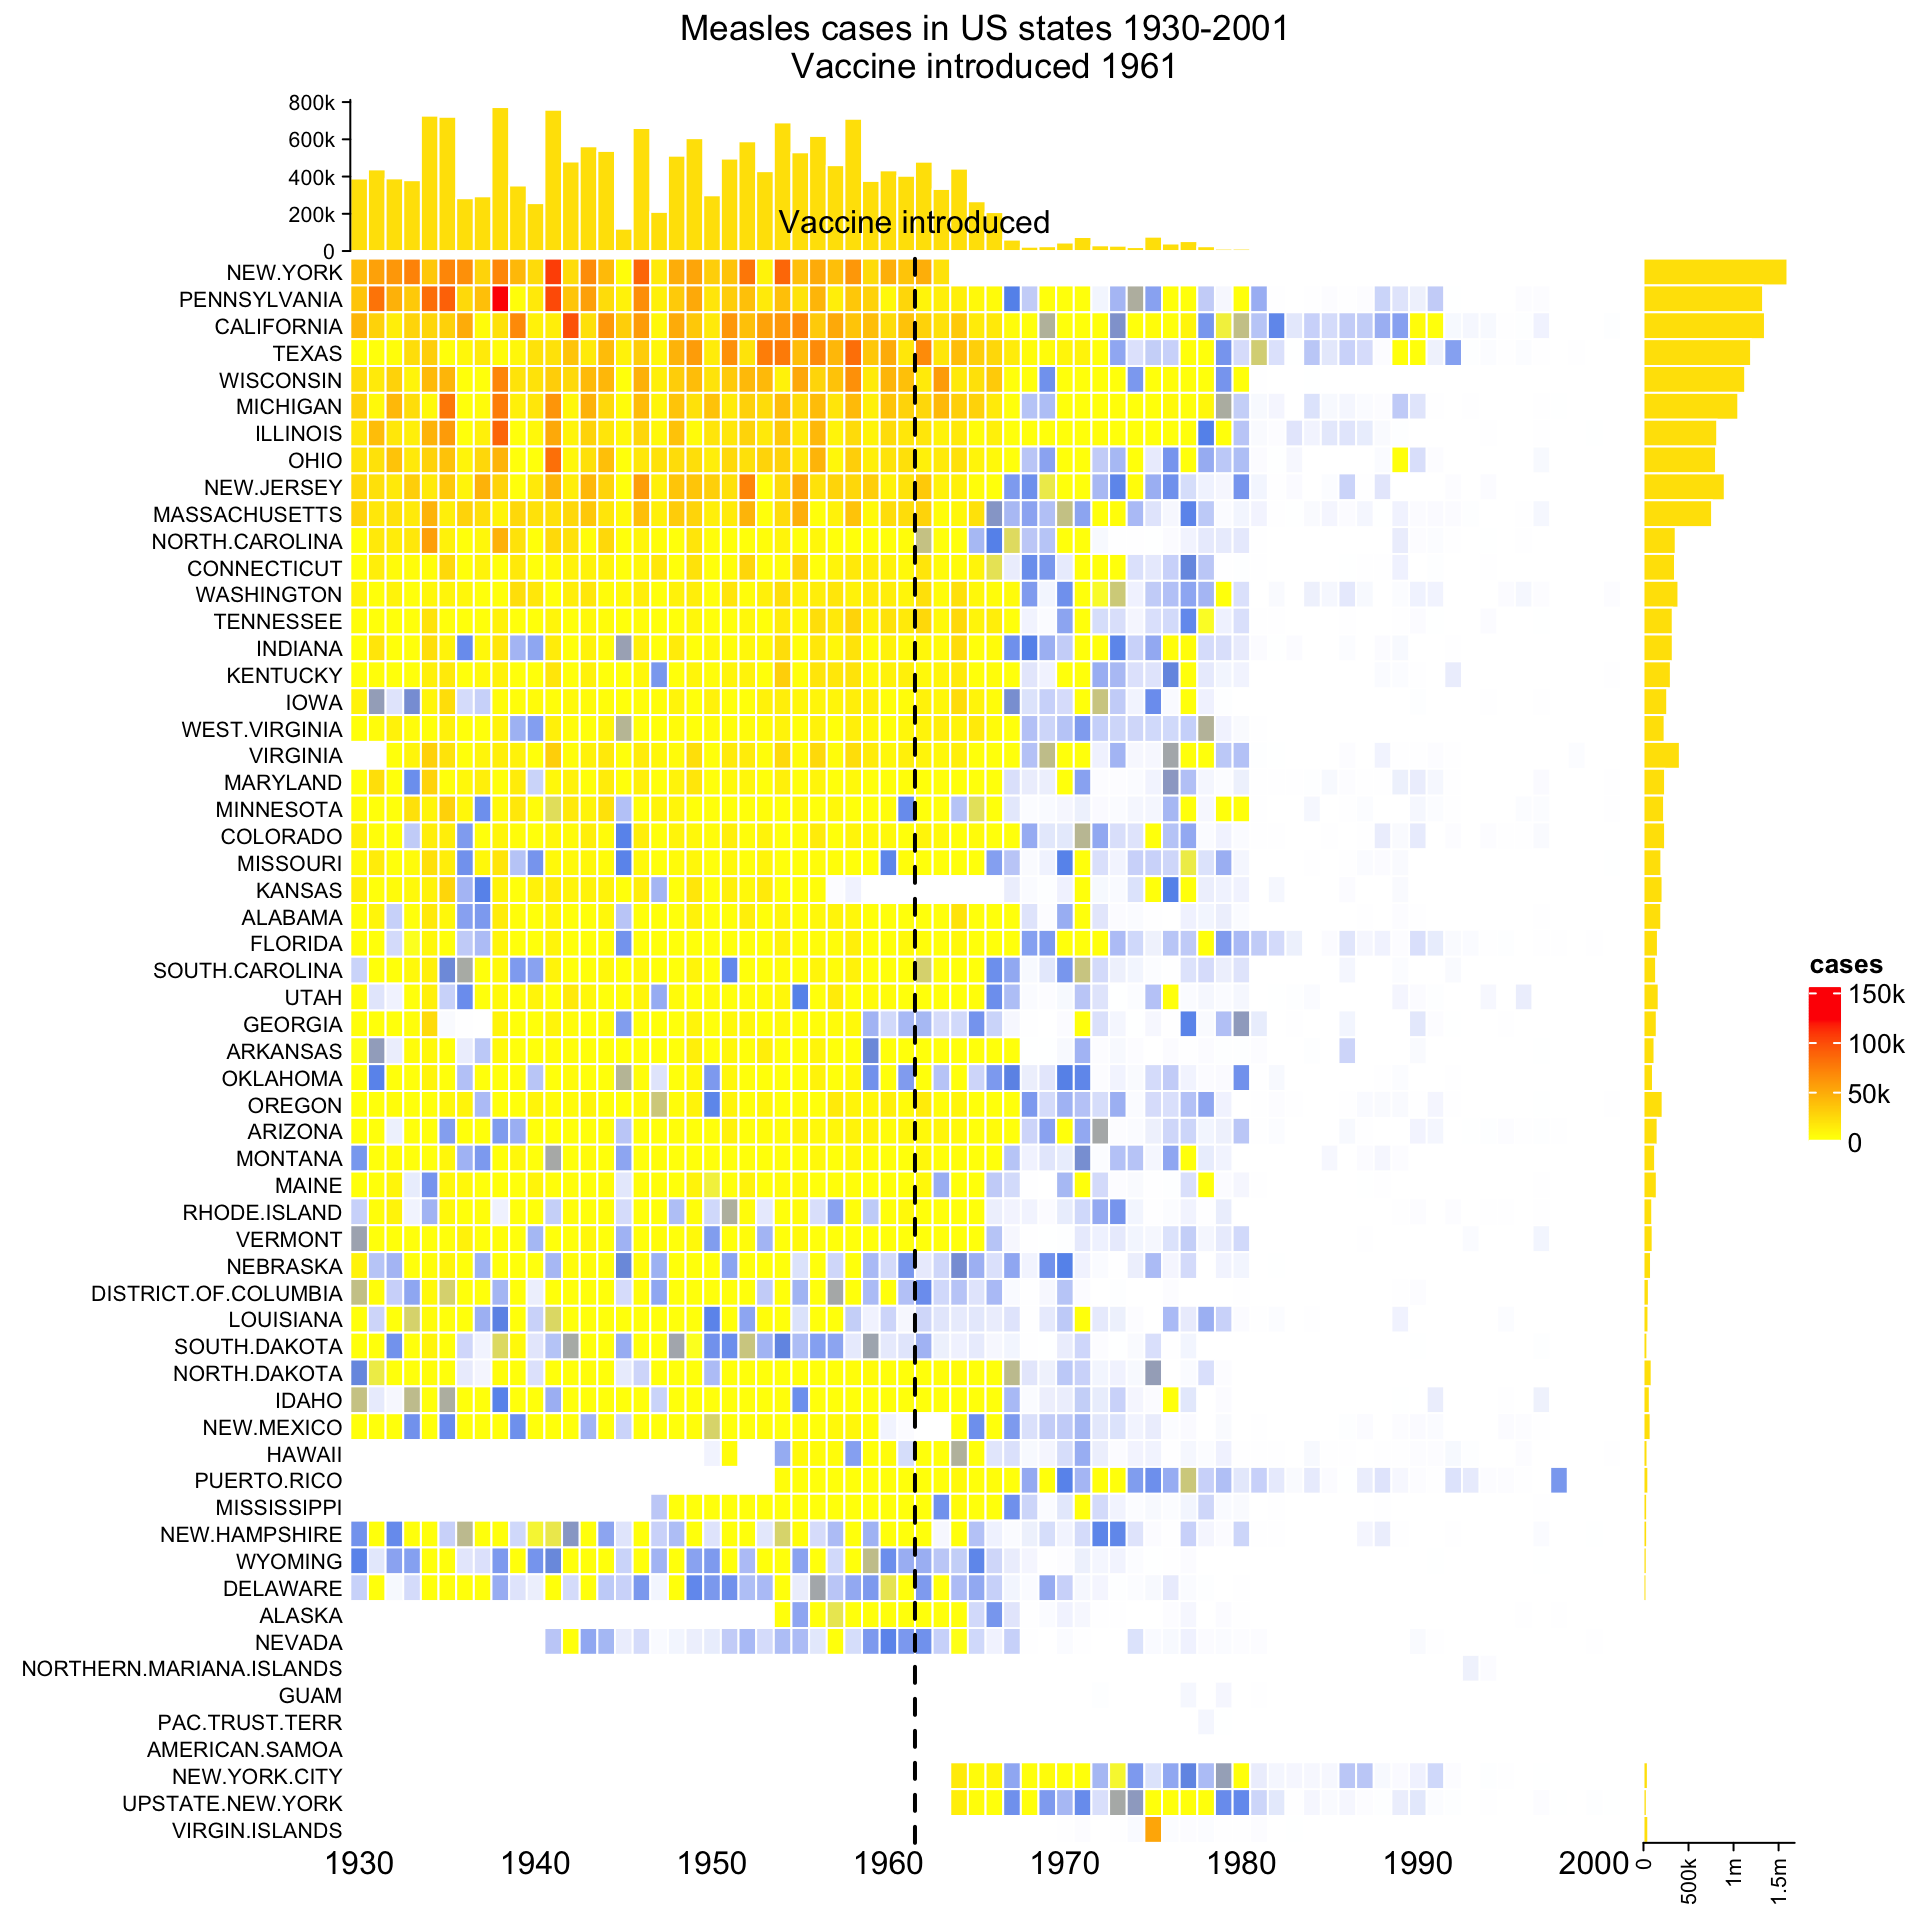
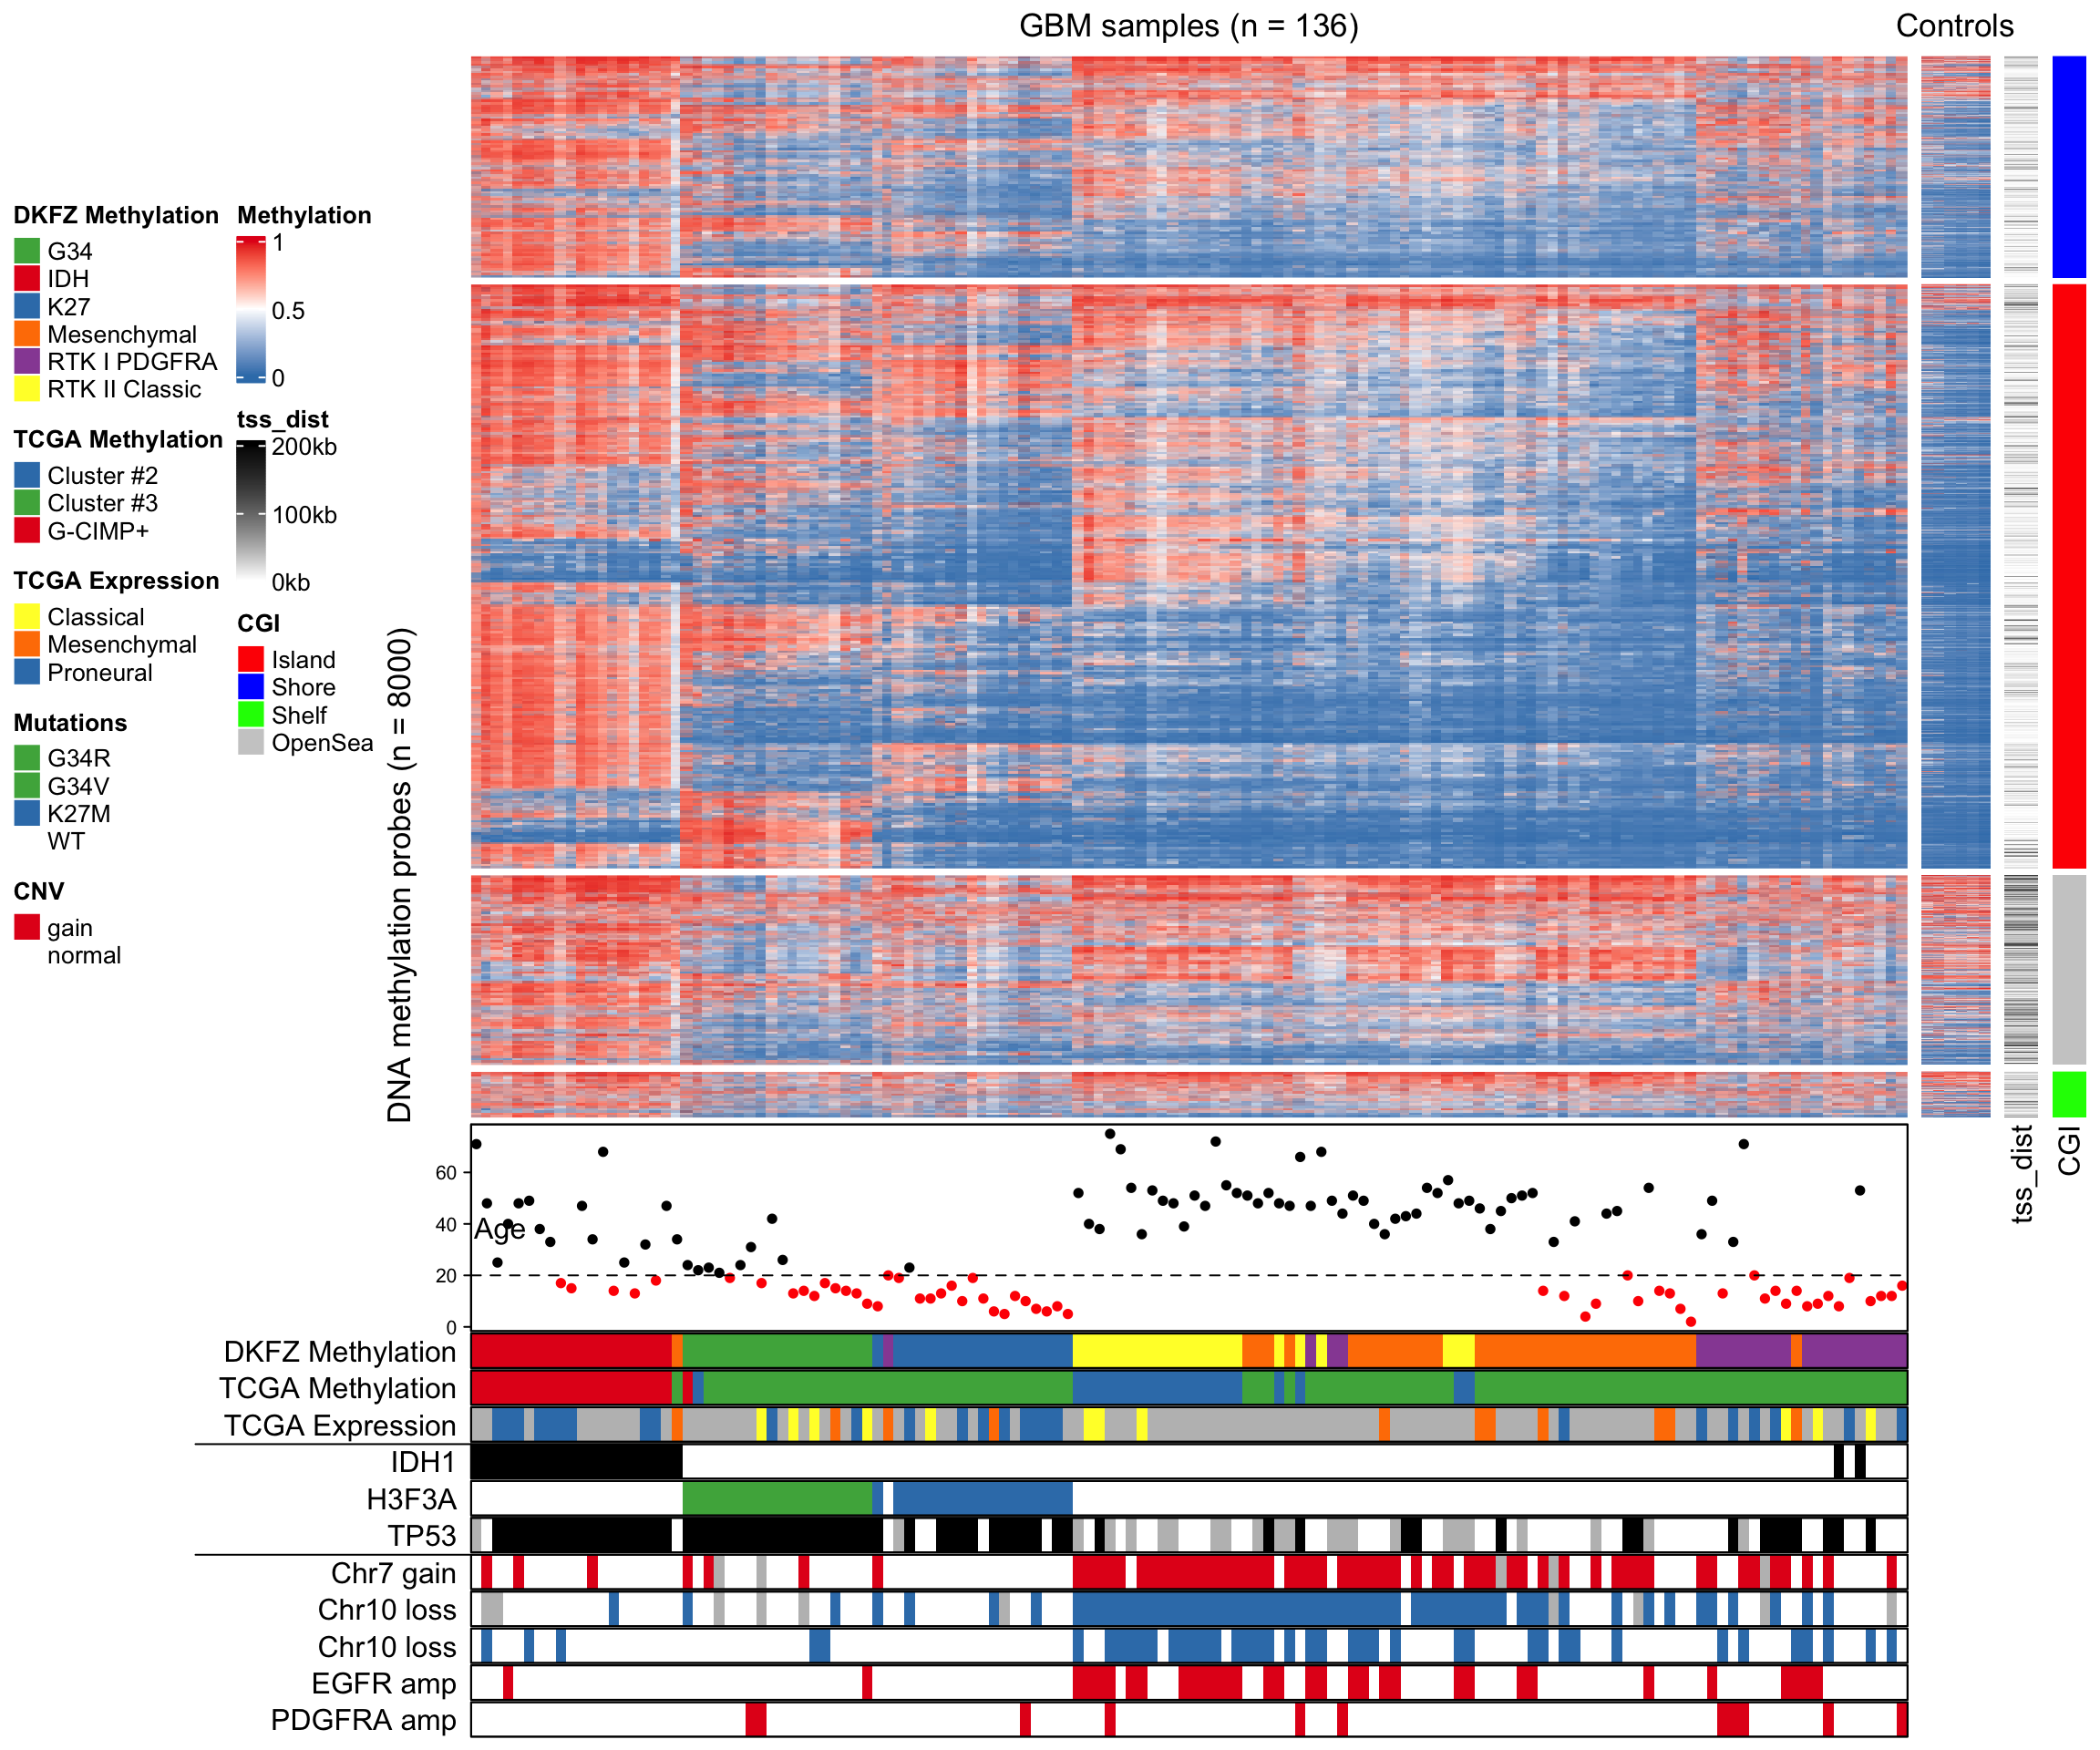
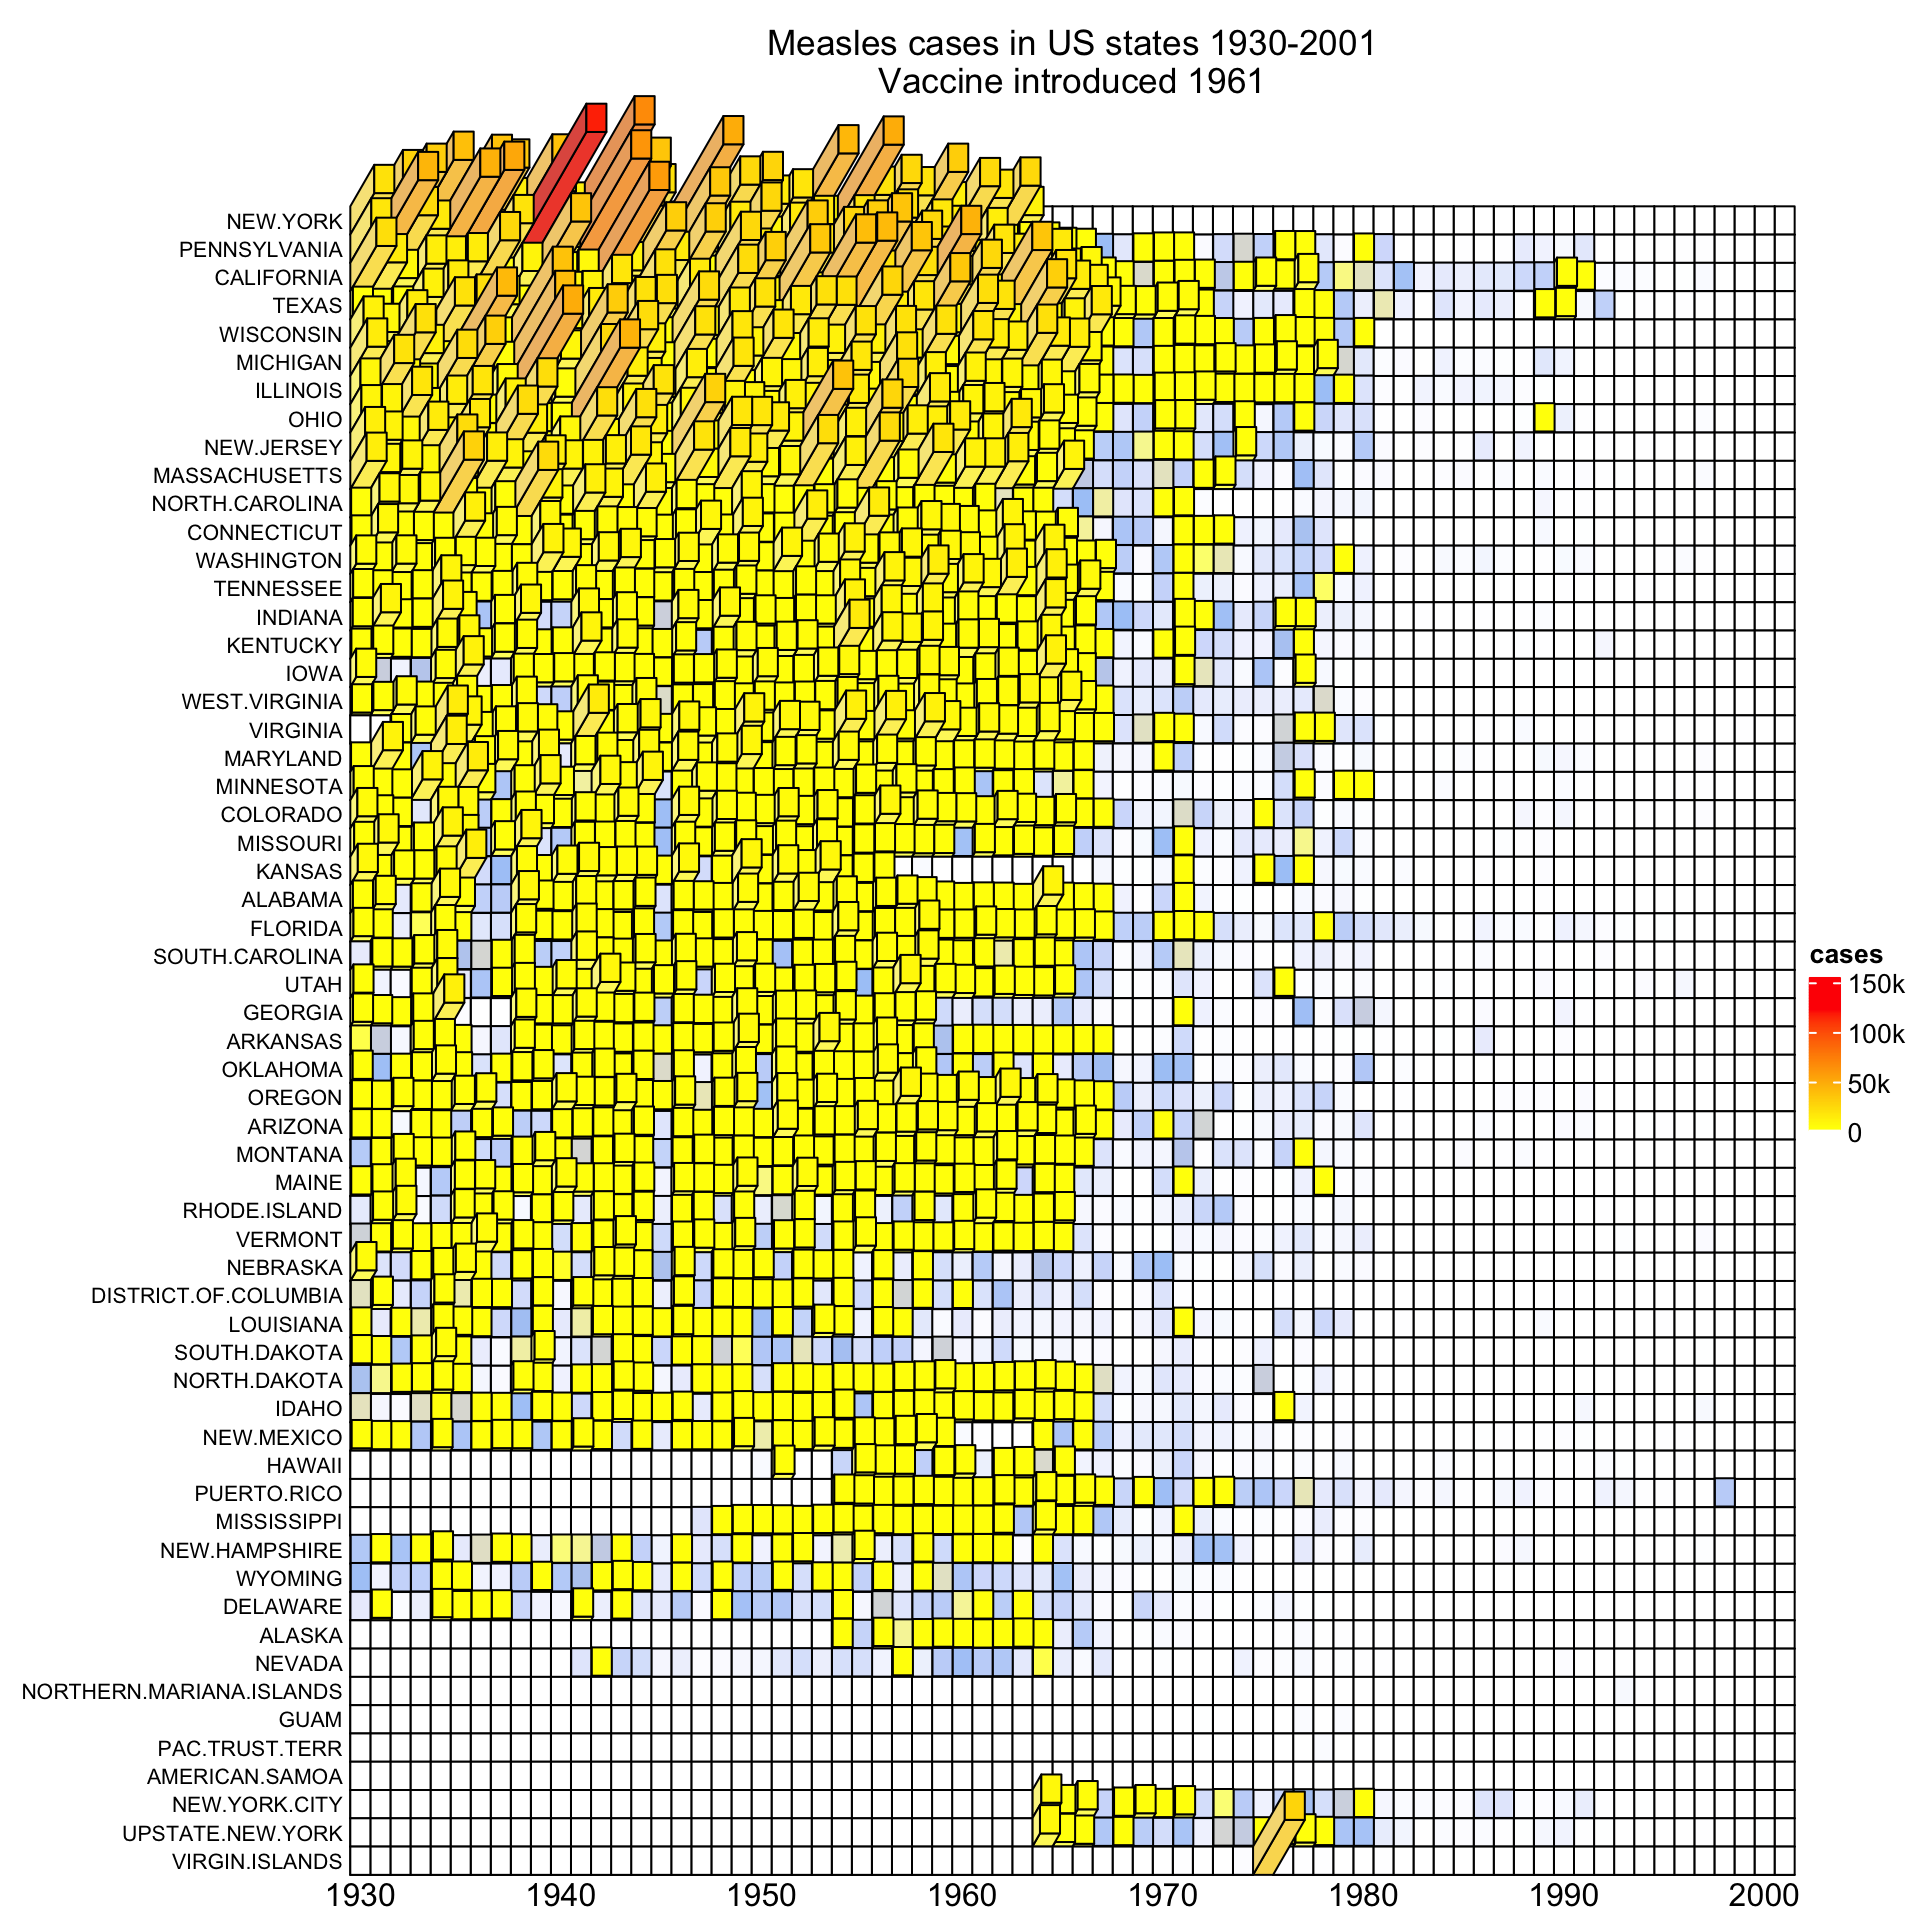
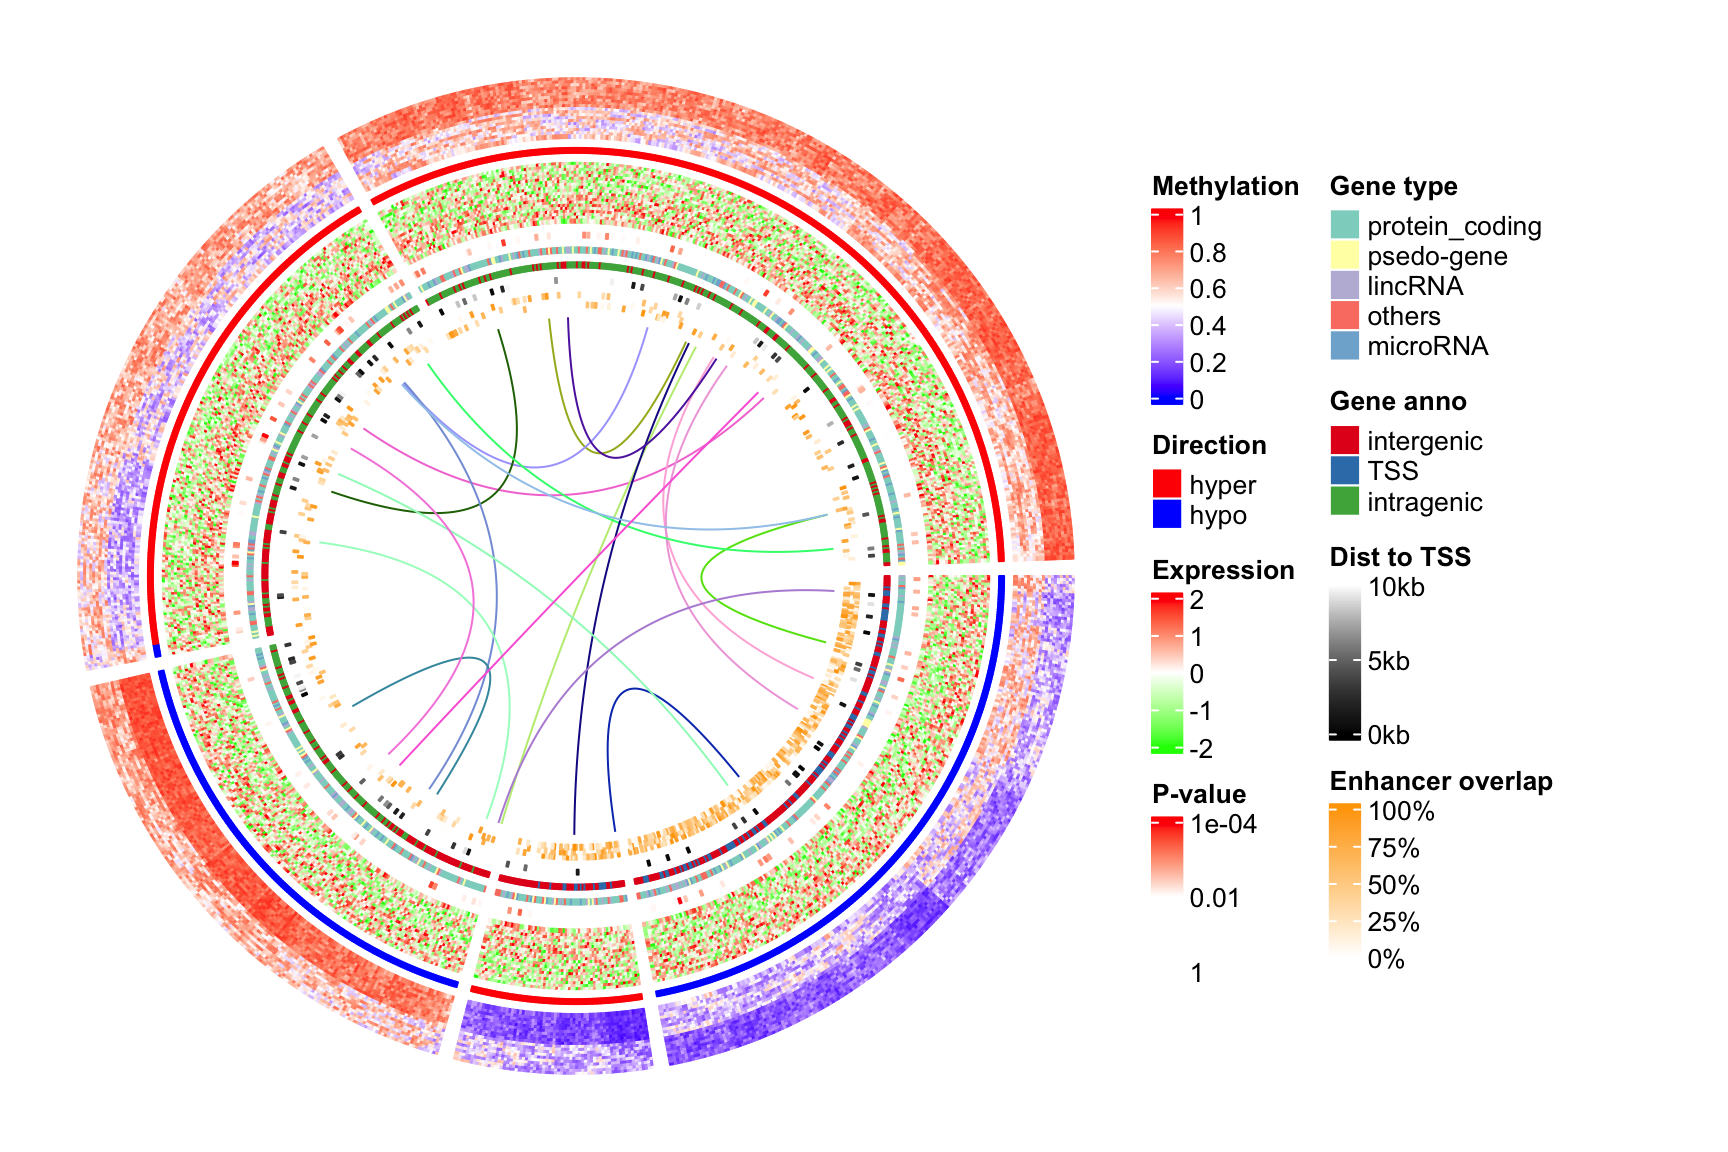
The ComplexHeatmap package67 - the best of the best
Introduction
The ComplexHeatmap package is developed by Zuguang Gu (aka “jokergoo”), who also created incredible packages like circlize, EnrichedHeatmap, simplifyEnrichment, rGREAT, BioMartGOGeneSets, and many more!
So much documentation!
The best thing about the ComplexHeatmap package is its documentation:
# ComplexHeatmap uses a matrix as inputComplexHeatmap::Heatmap(gene_expression_data_mat)
This is obviously a very basic heatmap, that could not be used in a publication like that. Let’s look at the incredible documentation and see what we can do to make it better!
The most versatile - but also complex - part of the ComplexHeatmap package is the manipulation of the annotations and legends. You can basically customize every single aspect.
# create annotationssamples_ha =HeatmapAnnotation(type = sample_annot_df$sample_type,condition = sample_annot_df$condition,# group = sample_annot_df$group,col =list(type =c("input"="#212E52","IP"="#D8511D"),condition =c("healthy"="#8087AA","EAE"="#FEB424"),group =c("Hin"="#0067A2","Ein"="#DFCB91","Hip"="#CB7223","Eip"="#289A84")))genes_ha =HeatmapAnnotation(which ="row",show_annotation_name =FALSE,is_immune_gene = gene_annot_df$is_immune_gene,direction = gene_annot_df$direction,col =list(is_immune_gene =c("yes"="#DE3C37","no"="#082544"),direction =c("up"="#79668C","down"="#F2DC7E")))# heatmapComplexHeatmap::Heatmap(gene_expression_data_mat,name="Normalized Expression Level",border = T,cluster_columns = T,cluster_rows = T,show_column_dend = T,show_column_names = T,row_title ="Top DEG",row_title_side ="left",row_names_gp =gpar(fontsize =6), # just for this documentcolumn_names_gp =gpar(fontsize =8), # just for this documentcolumn_split = sample_annot_df$group,top_annotation = samples_ha,left_annotation = genes_ha,col=c("black","#FEB424"))
Conclusion
The ComplexHeatmap package is incredibly versatile. It has a steep learning curve attached to it, but it is very worth it to learn with the great documentation. There also are some packages that make the transistion easier.